


- Home
- News
- Knowledge Center
- Machine Vision Lighting Types
Machine Vision Lighting Types
Machine Vision Lighting Guide: 5 Common Light Types
If wavelength is the "what color" of machine vision lighting, then lighting type is the "from where." And the direction, angle, and spread of your light source can change your inspection result just as dramatically as the color you choose. This guide covers the five most common machine vision lighting types — ring light, bar light, coaxial, dome, and backlight. For each one, we explain how it works, what it's good at, where it falls short, and the applications it's best suited for.
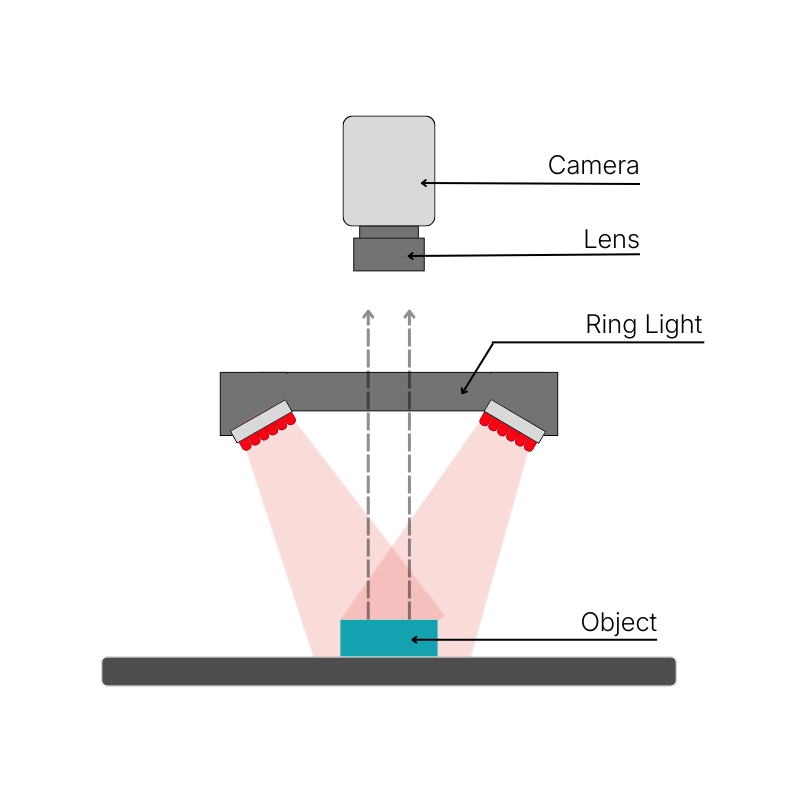
1. Ring Light
How it works
A ring light mounts directly around the camera lens and projects light downward and inward at an angle toward the inspection surface. Because the light surrounds the lens, it illuminates the object from all directions simultaneously — producing even, shadow-reduced lighting on flat or gently curved surfaces.
- Even, consistent illumination across the entire field of view
- Compact and easy to mount — fits directly onto most camera housings
- Works well across a wide range of working distances
- Available in a wide variety of wavelengths and sizes
- Cost-effective for general-purpose inspection
- Creates a characteristic ring-shaped reflection on highly reflective or mirror-finish surfaces — this glare can obscure defects
- Not ideal for surfaces with significant depth or complex 3D geometry — shadows form in recesses
- Less effective at revealing fine surface texture compared to low-angle lighting
- PCB inspection — solder joints, component presence, label reading Label and barcode verification on flat surfaces
- General surface inspection on matte or semi-gloss parts
- Electronic component inspection
The Key Question to Ask
- Is my surface flat or gently curved, and not highly reflective?
If yes, a ring light is often your fastest and most cost-effective starting point.
2. Bar Light
How it works
A bar light is a rectangular strip of LEDs that illuminates from one direction. Depending on the angle of mounting, it can produce brightfield illumination (direct, high-angle lighting) or darkfield illumination (low-angle, grazing lighting). This directionality is what makes bar lights uniquely versatile — the same bar light can produce dramatically different results simply by changing its angle.

- Highly flexible — angle adjustment changes the inspection result significantly
- At low angles (darkfield), it excels at revealing surface texture, scratches, and raised features by creating sharp shadows
- At high angles (brightfield), it provides strong, directional illumination for flat surfaces
- Can be used in multiples — four bar lights arranged in a square pattern can approximate dome lighting Ideal for large or elongated inspection areas
- Single-direction lighting creates shadows on one side of 3D features — can hide defects on the shadowed side
- Raised character and embossed mark inspection Large flat panel and sheet material inspection
- Less consistent than ring or dome lighting for surfaces requiring even all-around illumination
- Surface scratch and texture detection on metal, glass, and plastic
- Raised character and embossed mark inspection
- Large flat panel and sheet material inspection
- Conveyor-based inspection where the light can be mounted at a fixed angle to the direction of travel
- Do I need to reveal surface texture, fine scratches, or raised features?
Low-angle bar light (darkfield) is often the most effective tool for this — producing sharp shadows that make surface variations visible on camera.
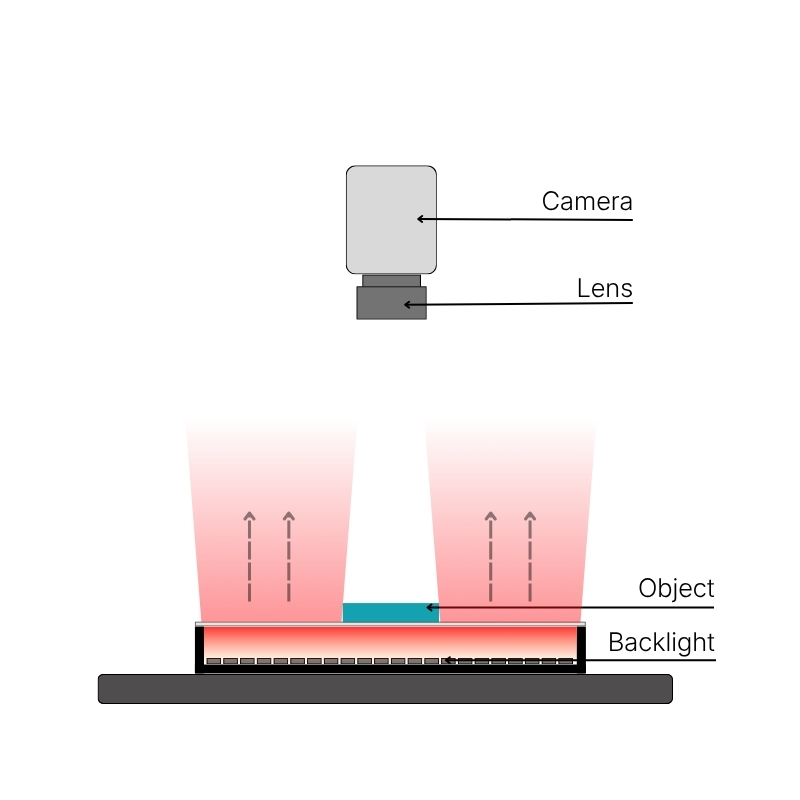
3. Backlight
How it works
Backlight — also called transmitted light or silhouette lighting — places the light source behind the object rather than above it. The camera looks down through the part at the light below. The result is a high-contrast silhouette image: the part appears dark against a bright background. This makes it exceptionally powerful for dimensional measurement, presence/absence detection, and transparent or translucent material inspection.
- Produces the highest possible edge contrast — ideal for precision dimensional measurement
- Unaffected by surface reflectivity, color variation, or texture — silhouette imaging ignores these entirely
- Can see through transparent and translucent materials to reveal internal features, bubbles, or contamination
- Simple, reliable, and consistent — backlights are among the most stable light sources in machine vision
- Excellent for detecting holes, gaps, and missing features
- Only shows silhouette and edge — cannot reveal surface defects, scratches, or color variation on the top surface
- Requires physical access below the part — not always possible in existing machine setups
- For opaque parts, only edge and profile information is available — internal surface detail is invisible
- Not suitable for inspecting surface features that require top illumination
- Dimensional measurement and gauging — diameter, length, profile Hole, slot, and aperture inspection
- Presence and absence detection — missing pins, incomplete assembly
- Transparent material inspection — glass vials, film, liquid fill level
- Edge detection and part orientation
The Key Question to Ask
Do I need precise edge information, dimensional measurement, or the ability to see through the material?
Backlight is almost always the right answer for these requirements.
4. Coaxial Light
How it works
Coaxial lighting uses a beam splitter to project light directly along the optical axis of the camera lens — meaning the light travels the exact same path as the camera's line of sight. Light hits the surface perpendicularly and reflects straight back into the lens. This eliminates the angled reflections that cause glare on reflective surfaces, producing clean, shadow-free, even illumination. 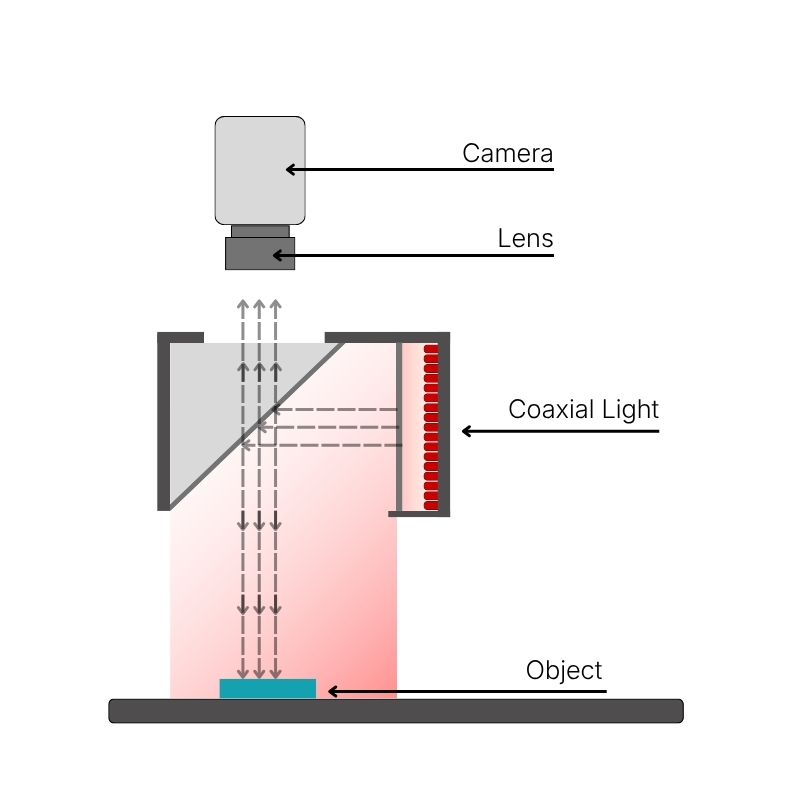
Strengths
- Eliminates glare and hot spots on highly reflective surfaces — the "secret weapon" for mirror-finish inspection
- Produces extremely even, flat illumination ideal for dimensional measurement and surface uniformity inspection
- Excellent at revealing surface scratches, pits, and contamination on polished surfaces as dark features against a bright background
- No shadows — ideal for flat surface inspection where shadow-free imaging is critical
- Only effective on flat or near-flat surfaces — curved surfaces reflect light at angles that miss the lens
- More expensive than ring or bar lights due to the beam splitter optics
- Requires precise alignment between light, beam splitter, and camera
- Larger and heavier than ring lights — requires more space in the inspection setup
- Wafer and semiconductor surface inspection
- Polished metal, mirror-finish, and chrome surface inspection
- PCB copper trace and via inspection
- LCD and glass panel surface uniformity
- Laser-etched code reading on reflective surfaces
- Is my surface highly reflective and flat?
If ring light produces a glare ring you can't eliminate, coaxial is almost always the answer.
5. Dome Light
How it worksA dome light is exactly what it sounds like — a hemispherical diffuser with LEDs mounted around the inside rim. The object sits beneath the opening at the bottom of the dome. Light bounces off the diffuser surface from all directions before reaching the part, creating the most uniform, shadow-free illumination achievable in machine vision. It is the closest thing to "perfect" diffuse lighting.
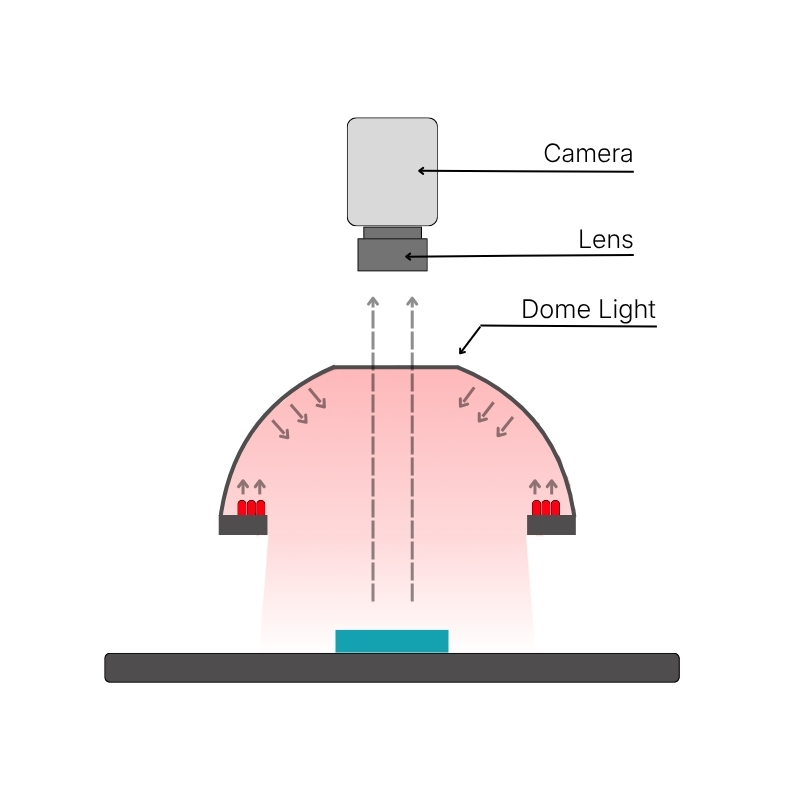
Strengths
- The most uniform illumination of any lighting type — light comes from every direction simultaneously
- Eliminates virtually all shadows and specular reflections Ideal for parts with complex geometry, curved surfaces, and multiple facets
- Excellent at revealing surface contamination, discoloration, and color variation
- Works well on both matte and moderately reflective surfaces
Weaknesses
- Physically large — the dome must be sized to cover the entire inspection area, which limits it to relatively small parts or requires a large housing
- Because it eliminates all shadows, it can make raised or recessed features harder to detect — the same property that eliminates glare also reduces 3D contrast
- More expensive than ring or bar lights Not suitable for inline conveyor inspection — the part must fit inside or under the dome opening
Best Applications
- Curved, irregular, or multi-faceted part inspection — connectors, fasteners, formed metal parts
- Color verification and surface contamination detection Jewelry, medical device, and precision component inspection
- Any application where shadow-free, perfectly even illumination is the priority
The Key Question to Ask
- Does my part have complex geometry, and am I struggling with shadows or uneven reflection using other light types?
Dome lighting solves both problems simultaneously.
Quick comparison — choosing the right type
| Light Type | Best For | Avoid When |
| Ring Light | Flat/matte surfaces, general inspection | Highly reflective surfaces |
| Bar Light | Scratch detection, texture, large areas | All-around even illumination needed |
| Backlight | Edge measurement, transparent materials | Surface defect detection |
| Coaxial Light | Reflective flat surfaces, polished metal | Curved or complex 3D geometry |
| Dome Light | Complex geometry, curved parts | Raised feature detection, large parts |
The honest truth about lighting selection
No single lighting type solves every problem. In practice, selecting the right light is a process of elimination — you start with the most likely candidate based on your surface and defect, test it, and adjust from there.
The most common mistake is choosing a lighting type based on what's familiar or convenient, rather than what the inspection actually requires. The second most common mistake is choosing lighting type before choosing wavelength — both decisions interact with each other, and the best result usually comes from optimizing both together.
If you missed our guide on wavelength selection, that is a good place to start before coming back to this one.
How to Choose the Right Color and Wavelength for Machine Vision Lighting
This guide covers the five most common lighting types. For specialized lights, power supply, and custom ODM solutions, explore our full product range: 3AM Product Catalog